
Unused RV Bunks Turned Into DIY Closet

Previously I’ve shared tips for organizing an RV closet, but what if your RV doesn’t have any closet space at all?
That was the dilemma faced by Carly Michelle, a personal finance coach and full-time RVer. There was no closet in her 2018 Forest River Wildwood travel trailer, and she quickly grew tired of opening her dinette booth each day to get to her clothing stored under the bench seats. She really wanted a closet where she could hang her clothes.
The camper’s bunk beds weren’t being used, so Carly decided to tear them out and build a DIY closet from scratch! With very little construction experience and a lot of determination, she designed and built the perfect closet for her needs!

Carly says, “Having a closet has made RV life so much better. It feels more like home with a closet. I’ve never been happier to simply have a place to hang my clothes (after months of RV life without a closet!).”
Below is Carly’s description of how she built her closet.
Removing the RV Bunk Beds
To turn the space for my bunk beds into a closet, first, I had a “demo” day and tore down each piece of the bunk bed. I unscrewed whatever I could, pried off the paneling, and used a saw to get the stubborn wood pieces off.

Preparing to Build the Closet
Once the space was cleared, I painted all the interior walls of my RV white. Then, I measured the exact dimensions for the closet (which is key!). I searched and finally found out the best option was to get two closet rods from Ikea to hang my clothes.

How I Made the DIY RV Closet Doors
My DIY closet consists of doors attached directly to the RV walls with hinges.
To make the doors I used white beadboard paneling for the outside of the door and pegboard on the inside of the door to have extra storage to hang items. On the outside to add character I framed the beadboard with moulding.

Between the two panels are wood studs. Initially I attempted the closet door with only a beadboard (that was only ¼ inch thick). I thought that lightweight would be great for an RV, but it really needed framing, and the pegboard adds extra storage. Framing and careful measuring are key!
I attached the panels to the studs with heavy duty construction adhesive. Instead of clamps to hold the pieces together I used my RV tow bars and let the adhesive dry for 2-3 days. Once dried I attached the doors to the wall with hinges. To complete the door, I screwed in door knobs.
How I Made Extra Space in the Closet
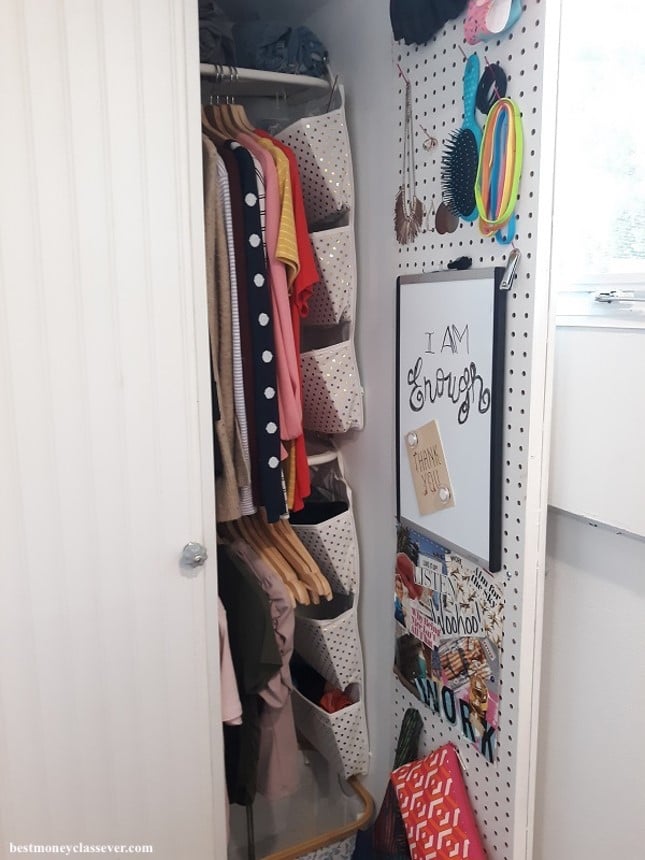
I used adhesive and leftover beadboard to construct a shelf for my jeans above the top hanging rod (seen in the photo above). I also added two hanging wall storage organizers and a laundry basket for dirty clothes.
At the bottom of the closet I made drawers to create extra space for shirts and shorts. I used extra scraps of beadboard and wood studs to create a frame for the drawers. For the drawers themselves, I used two wicker baskets with drawer hardware attaching them to the frame.

RV Closet Pegboard Organization
To finalize the project I mounted a mirror on the inside of one door with Command Strips. To mount other items like headbands, nail clippers, bags, etc. I inserted cut leftover sticks (from fourth of July sparklers!) into the pegboards. Lastly, I added a dry erase board and a homemade vision board.

Now I have a closet that I love!

Questions about the project
Below are some of Carly’s answers some questions I asked her:
Q: How long did the project take?
“Tearing down the bunk beds only took a few hours. Painting the entire RV was the next step (and that took FOREVER!). Once the space was clear it took a handful of weekends to make the closet itself.”
Q: Did this project require any special skills or prior experience?:
“I had no experience in renovations and learned as I went! I just had basic knowledge of how to use a drill!”
Q: What tools were required for this project?:
• Drill
• Handsaw
• Screwdriver
• Dispensing Gun
Q: What materials were used for this project, and where did you purchase them?
• 2 Hanging Rods from Ikea
• White Beadboard Paneling
• Pegboard
• 4 Wood Studs
• 4 Plastic Moulding
• Construction Adhesive
• 2 Hinges
• 2 Door Knobs
• 2 Drawer Hardware sets
• 2 Hanging Wall Storage Organizers
• Mirror
Q: About how much did the project cost?
$132
Q: What advice would you give other RVers who are considering this project?
“If you want to make a closet and you have little experience, this is a doable project! Be patient with yourself and in the end you’ll finally have a closet in your RV! It’s worth the work!”
Video Tour of Carly’s Closet
In the video below, Carly shows off her new closet and gives more details about how she built it:
If you have more questions about Carly’s project, you can ask her directly by sending her a message via her Facebook page!
To learn more about Carly, check out her blog!
For more RV organization and storage ideas, go here!
To see another RV bunk bed removal project, check out this article about how an RVer turned a corner bunk room into an office!
Want to have us feature a cool project you’ve done in your RV? Submit it to us here!


The post Unused RV Bunks Turned Into DIY Closet appeared first on RV Inspiration.